Welcome to the home of the Spindletop Railroad!

Follow along as I try to create a freelanced railroad and build my first HO scale layout. I hope to write a blog that helps others in building layouts, detailing engines, and creating their own railroads while identifying the road bumps to avoid and the fun aspects of model railroading to look forward to!

Sunday, July 12, 2015

Random Workings and Real Trains

Howdy again internet!

While the layout is dismantled and stored for the time being, I kept a module out for photo shoots and practicing different things.

Specifically, I kept the yard track module.  M reasons are simple.  It doesn't have any structures on it, so I am working on the scenery portion.  Scenery is the area I have the least experience in with layouts.  My previous layout endeavors only received minimal scenery, and it was all of the super cheap, super simple variety.  This layout has received new techniques, new products, new everything!

I am also working on adding in an overhead lighting system.  Once I get some fascia in and clean it up, I will post a how to.

In other news, my job has been secured for the immediate future.  Thankfully I have avoided the layoffs that are affecting so many in the oil and gas industry.  The best part of all of this?  I get to remain somewhat financially stable.  The second best part?  Trains.  Lots of them.  Seriously.  I spend most lunch hours cruising along the two biggest yards in Houston, possibly even this part of the state.  They are Englewood and Settegast Yards.  Englewood was once Southern Pacific and Settegast was Missouri Pacific.  Both are now absorbed by the UP...  However, they still provide the opportunity for some great finds.  I could almost do a daily post on the neat things I see out there.  Below are some of the better items!

A few weeks back we have a quintet of random 4 axle power roll through.  If I remember right, they were being sent from Canada to sell to short lines, or maybe Mexico.  I has been a while since they came through, sorry for the poor memory.

I watched this ridiculous load of something bundled get humped over one of the two hills in Englewood.  Thankfully none of the securing lines snapped!

Earlier this week, I was surprised by the Mopac heritage unit!  She was leading a through freight and I caught her while on a late lunch.  Perfect timing!  Also, UP needs to get her into a paint booth.  She is rusting out the battery boxes, the handrails are all beaten up, and that fuel tank is almost shameful. 
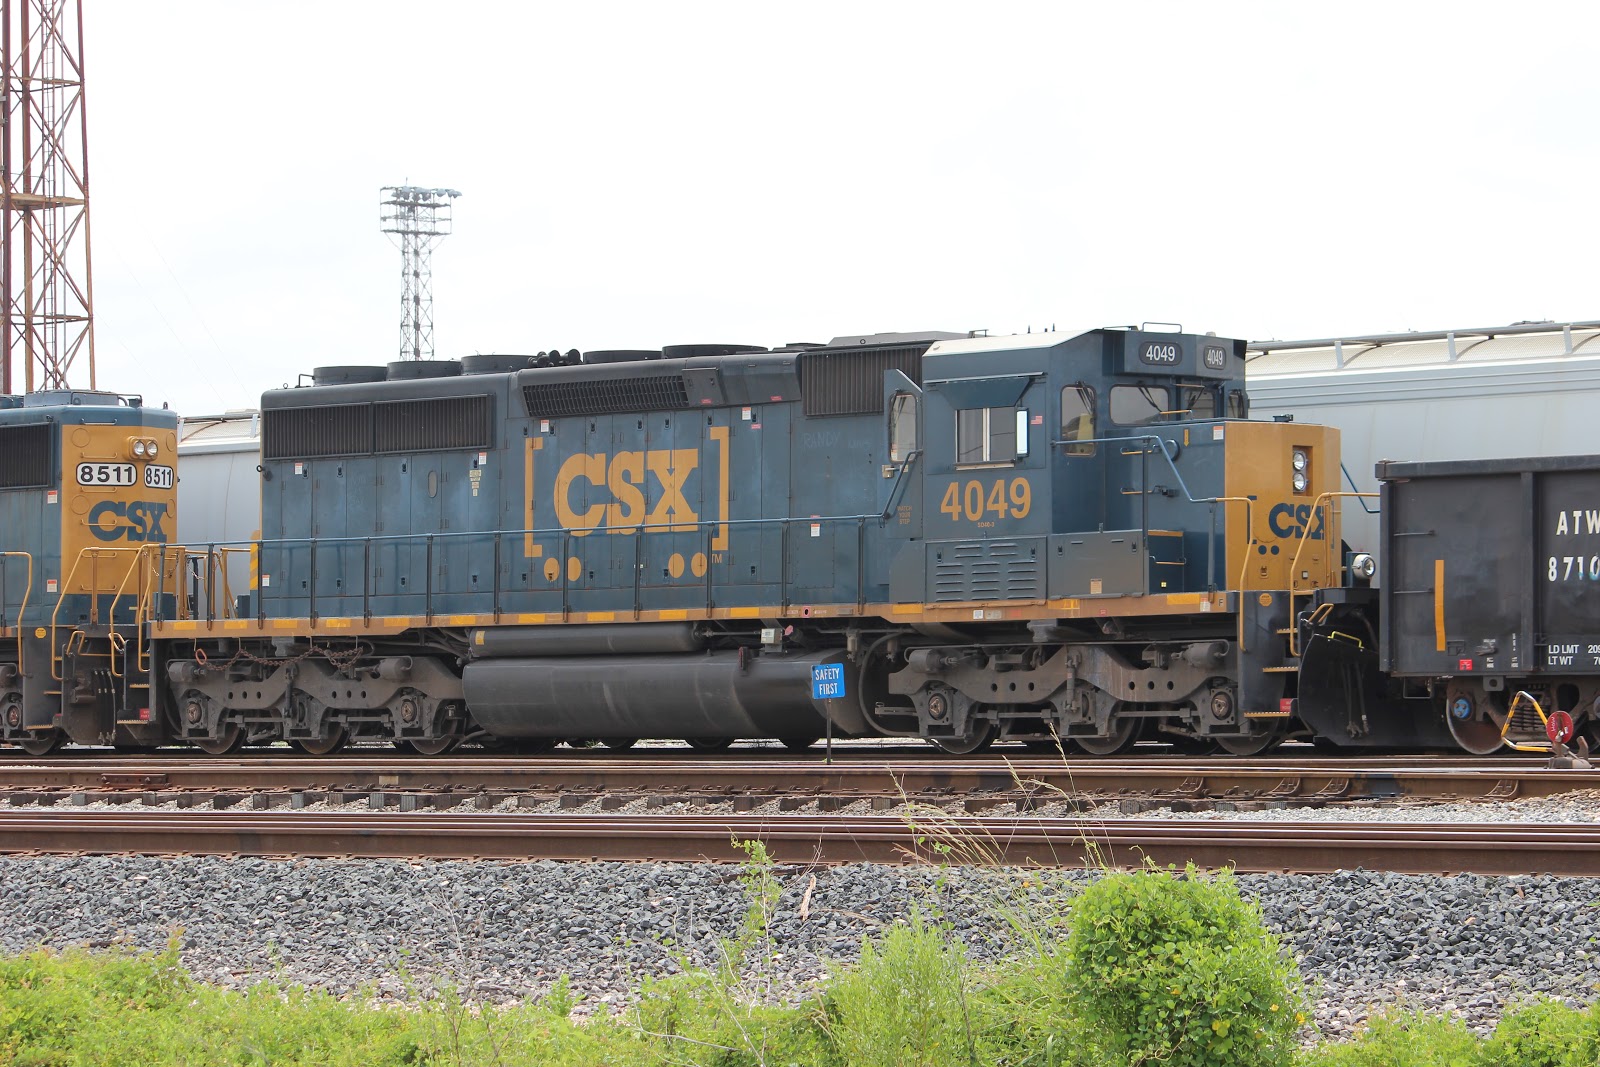
I caught this beauty on Friday.  She is a CSX SD40-2 but she was rebuilt with the strange cab that you see here.  It also includes an odd nose.  Still, a fun one to see in person!

Lastly, we have the catch of the month!  I could not believe my luck with this one.  Here is FEC 800.  She is in Texas trying to get to San Antonio to be converted to LNG at one of the loco facilities there.  This catch was entirely luck as I did not know this loco would be in town until I had already gotten to work, and then the yard was nice enough to leave her out with no trains in the way!  Truly a beautiful locomotive and a true joy to catch.
 
Anyways, that is all from me for now!
 

Sunday, May 17, 2015

Changes and New Life

Well the past couple weeks have been busy.  The last time I was this busy I was graduating college...  The last week of April I got a new job!  It is a fun job with a lot of potential and near the big train yards but it is on the other side of town.  In most cities, that doesn't mean much.  However, I live in the Houston metroplex.  My commute is an hour each way.  With traffic it can be much worse.  My better half is also getting a new job in about the same area.

Sooooo we will be moving soon. 

I haven't even gotten a chance to work on the layout in over a month we have been so busy.  And now, it is dismantled for a while.  Fortunately it is in modules for this exact situation.  I have gotten most of it packed away but I am leaving the yard module out so I can experiment on the scenery.  Hopefully soon we will have a new place for the layout.  Now to move across the 4th largest city in the country.  Wish me luck!

Also, the CFO (again, better half) has finally caved.  That's right.  A backyard railroad has been begrudgingly approved!  So in a few months, I will have an HO layout and a small 1/8th scale railroad I can ride!  If you want to learn more about these types of models, check out Discover Live Steam and explore around.  They have a lot of good information and links.

Anyways, that is life for the time being.  I hope to be back on here soon with a new home for the SRR.  Maybe I can use this time to really flesh it out, get some things set, figure out what I am doing with it long-term. 

Random pic of the day!


These two are of the local run near my house.  Business must be picking up because I have never seen such a long train or three engines on it.  The locos are in the UP Y21XX series and are MPI MP20GP re-builds of old GP50s.  They have Cat 3516C motors that generate 2000 HP and meet Tier II EPA regulations.  They are used down here to service several industries, but I love seeing the big gondolas, bulkheads, and tankers.  Very modern and very cool!

Wednesday, April 8, 2015

Scenery Update

Last time I talked about my process for creating the scenery around the yard.  Well, as I was looking at it while working on other things I decided I didn't really like it.  I couldn't tell why at the time so I just ignored it and kept going.  A few days later I was trying to level out the garden in my back yard when it hit me: it was all too flat!  The fine turf creates a great blend of colors when viewed from above, but when viewed from a sitting or lowered view it is rather bland. 

To break up the boring, I decided to begin adding other types of turf.  In this case, coarse turf in Medium and Light Green from Woodland Scenics.


These two bags contain a product that is similar to taking the fine foam an rolling several pieces into a ball.  It takes a little work to spread around but is definitely a great product for my needs!  I spread it out in a random pattern and then glued it down using the same methods from the previous post.  While the glue was still wet, I sprinkled on a little more the coarse and fine turfs to add more color and blend it all together.  Below are the results.


So why it is all still as flat as a board (get it?!) this creates a better visual that draws the eye away from the flat land and creates a sense of elevation changes.

I plan on enhancing this using grass/bush tufts of various forms from several makers before calling it complete.

And now for the prototype photo of the day!

Here we have BNSF 1244 and a sister, both 3GS21B locomotives, transfer some cars from the Pearland Yard to the South Yard in Houston, TX.  I love whole train shots so this was a lucky catch!   Plus it is always fun to hear the reefer compressor units running (all on the end of the train).  Now if only I could get rid of all of the weeds, signs, old posts, etc. 

Thursday, March 12, 2015

Yard Ballast and Basic Scenery

Howdy everyone!  I have been using my recent free time to work on the yard on the layout.  This includes ballasting the tracks and putting down the basic scenery.  Below are the results of the first layer of scenery and what I know of ballast.

BALLASTING is one of those model railroading tasks that you either love or hate.  I have honestly never met anyone who is in the middle on that.  I personally fall into the love category.  I am only okay at doing it though , as this is maybe my second attempt in HO scale.  I had some basic experience while in N scale but that is a whole different beast. 

So while I am certainly no master, I will explain my technique.  Who knows, it may help someone out!  So the best ballast to use (and a lot of others agree and echo this opinion) is Highball Products ballast.  This is real stone!  The yard uses dark grey limestone.  Here is the bag I am currently using.


The first step is to pour a very small line down between the rails.  Put in so little that you don't think it will fill.  Trust me, it will.  Too much becomes difficult to handle once you spread it out.  Anyways, once you have the small line take a foam brush (I like and use the 2" brush with a 3/4" brush for backup) and spread the ballast between the rails.  Clean it off of the tops of the ties and be sure to clear it out of the web of the rail.  A quick tap of the rail head with the brush handle can usually do this.  Also, be sure to check the "tie plate" area where the rail is held to the ties.  The smaller pieces lodge in this area and are obviously out of place. 

Next is the shoulders of the track.  Now, my yard tracks are laid straight on the decking so there is not much of a shoulder.  I try to keep the ballast in close to represent yard tracks that don't handle a lot of heavy, fast traffic.  For mains and sidings, I would want more but that is for the future.  Today we are focusing on the yard.  So what I do here is pour a small line along the tops of the ties on the outside of the track.  Then using the same 2" foam brush, I come along and brush the ballast away from the tracks.  I use a slight angle as demonstrated below.  This allows the leading edge to clear away the larger piles and the back side to clean the leftovers off of the top of the ties.  In this case the leading edge is on the left of the pic.


Now you fill in any gaps or touchup as you see fit!  Then glue it all down and you're done.  One last note, be extremely careful around turnouts and crossings.  These little stone pieces can get in everything and foul it up beyond usability.

SCENERY is much different task for me.  It is so simple that you can't help but love it.  I start by painting the decking a standard brown color, but I certainly recommend using a tan color.  Brown does make a more realistic dirt color, but it make a really dark subcolor for all of the greenery.  So take that advice as you will. 


Once the paint dries, I apply a thin layer of full strength white glue every where that I want to have base scenery.  In this case, it is the grassey areas and the little gravel road.  Next I applied an even layer of Woodland Scenics Green Blend "grass" and some old Highball N scale ballast for the gravel road. 


Once the glue dries, I vacuumed up the extra grass and gravel.  ***IMPORTANT: put down the grass before the ballast so you don't vacuum up your hard work***
Next, I take various colors of ground foam and apply them over everything in a random pattern and density.  Here I used JTT green, WS burnt grass, and WS earth, all in the fine variety. 


Once you get something you are happy with, spray it all with the iso alcohol.  After a little time for it to soak in, I soak everything in a thinned glue mixture.  The glue is 2 parts water to 1 part while glue.  I use a syringe to apply the mix and soak everything in it.  I make sure it gets into all of the ballast and scenery.  Again, be extremely careful around turnouts.  The glue can glue turnout points to the rails...  Don't ask how I know this.

Lastly I sprinkle on a little more random turfs to accent what has been glued down.

The top of the picture has the scenery all glued down and the bottom is only prepped for gluing.


Again this is only the first layer!  So much more can and will be done. 

Hopefully this can serve as a basic guide to other beginners.  Also be sure to check out publications by the professionals, such as Pelle Soeburg or Lance Mindheim or the many great people at MRH E-Zine!

Monday, March 2, 2015

Progress Update

Howdy everyone!

I have had a LOT of free time lately.  Turns out getting laid off can do that to you.  So while this means trains funds are essentially nothing (read: actually nothing) it also means that I can do what I can with what I have.  Which is a lot actually!  There is seriously a huge list of things to do.

Right now I am working on the scenery.  I added some hills of extruded foam and coated about half of the layout in brown paint.  I am most of the way done covering everything in a layer of Woodland Scenics Green Blend fine turf as a base layer.  There will be several more layers of scenery to come.  I also will be adding the ballast to the yard while I do the rest of the scenery.  The basics can be seen in the below picture.  Hopefully I can get some better pictures and process explanations up later this week.

In addition to all of this, I used what was left of the train budget (and some begging of the CFO) on a new engine at the local train show.  I like supporting the vendors at the Greater Houston Area Train Show as they are typically small time guys and they have great prices and even better customer service.  I bought the below engine for only $50.  They are going for over double that on eBay...  Anyways, this Athearn SD45 is a great runner.  I have some extra details laying around that I can spruce it up with.  It is also pretty close to the base black color I want the railroad to have.


I will have to cover up the PRR logos, but I will hopefully be able to do that soon.  I downloaded a free Vector file program called Inkscape.  It will be used to design some custom decals that several fellow modelers on the internet will print for a nominal fee.  That will be so much simpler than putting on individual letters...  

Until next time!


Thursday, January 29, 2015

New Paint Scheme

Howdy everyone!  I finally got a paint scheme nailed down that I like.  What do y'all think?

Yes there is also now a new caboose!  More on that later.

The biggest conflict on what I want has been to have something simple but distinct.  I do not have the skills, equipment, or finances to get into really well done painting and decaling.  In my past attempts, the paint goes on too thick or pools up, the decals never come out the right color, and custom work is expensive, etc., etc....  So for now I will stick with the simple design I have on the above.  

I chose to have the body be a simple black color.  Both loco and caboose were sprayed using a regular rattle can of flat black paint.  The bottom of the plow and the edge of the walkways are Signal Yellow by Floquil that I hand painted.  All of the handrails on both were done using a yellow paint pen I got from work.  Big box hobby stores have these as well for good prices.  The lettering, conspicuity stripes, and nose stripes are from Microscale.  And yes, the names on the sides were done one letter at a time.  I spent 2 hours on the caboose name and it STILL isn't straight.  

The face colors are the finishing touch.  I love my home state and I wanted to represent it somehow. Seeing lines such as the Heart of Texas or Alamo Gulf Coast made me want to paint the whole thing in a flag scheme, but that would have killed my OCD (curving masking tape?  No way) and was outside my painting abilities.  So I scaled it back and found out that this looks really nice as well!  I plan to stick with this scheme for all future locomotives and cabeese (cabooses?  Seriously need to figure out that plural).

And now for the random pic of the day!


Today's selection is a fun one.  I found this beauty entirely by accident on my way home from work.  I had heard she was coming, but I figured she would be going well away from my area of town.  Then BOOM! her she is waiting to head South on the BNSF line along Mykawa Rd.  I do not remember much of the history of this engine, other than she is a former Duluth, Missabe and Iron Range (I think that is right) locomotive.  The best my fellow Railspotters and I can make out, she is going to be a industrial locomotive in Bloomington, TX, possibly at the port near the city.  Anyways, it was an absolute joy to see this old girl.  Hopefully there are many more safe miles in her furture!


Saturday, January 10, 2015

114th Anniversary of Spindletop Gusher

Today marks the 114th anniversary of the day that changed the oil industry, and the state of Texas, forever.  On January 10, 1901 the Lucas oil well struck a deposit at the Spindletop site.  It was such a surprise, and so large, that it ended up taking nine days to get under control!  Picture courtesy of the Spindletop website.


This event changed the area I grew up in and state I love more than almost any other instance in history.  That is why I named my rail road Spindletop.

If you would like a more detailed hstorical account, click the link below
Spindletop - Gladys City

As far the layout, I am working on painting the track.  Two of the modules are done. Since I have to move them off of the wall anyways, i am also raising them about four inches.  Hopefully it will make them easier to maintain and improve.  Plus the train room is finally getting cleaned!  A surprise, I know!  But definitely needed.  I should finish tomorrow.