Specifically my model railroad.
I have been making slow progress, but progress all the same.
I don't have any new pictures for this update yet. I may put them in another later post. Sorry.
Layout: work is progressing steadily. I have all of the turnouts I need now so track will be laid in earnest once the layout is fully built. One frame and the remaining decking to go! Currently about half way on the decking.
Paint Scheme: a new Texas-themed scheme should be getting applied to a new loco shell next week. I hope it comes out as cool as I imagine it as.
Prodigy: my trusty DCC system up and burned out on me a few months back. MRC got her fixed up and returned so the engines can move a little at least
Yard: the yard ladder should be secured and powered by the weekend! Once the ladder is tested and operational, I will lay the yard tracks and put out some rolling stock.
Until then, have a good time everyone!

Wednesday, April 2, 2014
Monday, March 10, 2014
Construction Continues
They say that no good plan survives contact with the enemy. I find this to be true in many cases, particularly mine. I have had good results using the shelf brackets of the previous posts on earlier layouts, but those were mostly a loop of Bachmann track on 1X4 boards around the walls. The layout I am building though uses two foot wide frames and as a result the brackets are flexing too much. I tried everything I could think of to reinforce them, but alas, nothing worked to my liking.
After a week of deciding, I chose to build the layout with legs. I had originally decided against this but it really is the simplest way to go. So, I am removing the shelf supports and using the wood planks to make the table legs. The modules are resting on these legs and a piece of wood that is screwed into the walls at my level line around the room. The nice part is that all of the support pieces are at the same places as the brackets were, so the frames are the same size.
Now for the pictures:
The wall supports
The modules on their legs and supports
This is the first two modules installed
The frames are made out of 1X4s and decking screws. I really like these screws because they use a #2 square head instead of a Phillips. That means a whole lot less stripping. The legs are the leftover bracket decks, same for the wall supports. The frames are held to each other using 1" screws until I can procure some bolts and washers for a permanent fix.
Next is the plywood to make the decking! Then it will be time to move on to the next half of the room.
Wednesday, February 5, 2014
Stuff from Christmas
Howdy again!
It is a bit late, yeah but I did want to show off some of the stuff I got this past Christmas. My wife went out of her way to find me some awesome train related items. She found a dealer on that Etsy site, which is actually entertaining and does have trains for sale, that had good train items.
One is a lantern from 1901 that used by the Southern Railway. It is a bit beat up but clearly used and has traceablity on it to authenticate it! Unfortunately I don't have a picture of it yet...
The second item is this Southern Pacific logo in brass. The dealer had bought it from someone who had found it while walking an abandoned/torn up old SP right-of-way out in California. Unfortunately we cannot determine what it came from or it's use... But it still looks really cool!

And the third item is an SP engineer's guidebook from the 60s! It is well worn and not exactly a collectible item of value but I certainly love it. To give you an idea of the age of the item, it shows pictures of where to place marker lights on steam locomotives. Yeah, steam.

It is a bit late, yeah but I did want to show off some of the stuff I got this past Christmas. My wife went out of her way to find me some awesome train related items. She found a dealer on that Etsy site, which is actually entertaining and does have trains for sale, that had good train items.
One is a lantern from 1901 that used by the Southern Railway. It is a bit beat up but clearly used and has traceablity on it to authenticate it! Unfortunately I don't have a picture of it yet...
The second item is this Southern Pacific logo in brass. The dealer had bought it from someone who had found it while walking an abandoned/torn up old SP right-of-way out in California. Unfortunately we cannot determine what it came from or it's use... But it still looks really cool!
And the third item is an SP engineer's guidebook from the 60s! It is well worn and not exactly a collectible item of value but I certainly love it. To give you an idea of the age of the item, it shows pictures of where to place marker lights on steam locomotives. Yeah, steam.
Anyways, that is all for now. Back to the layout construction!
Wednesday, January 29, 2014
It Begins!
I have finally started building the layout! The last month has been spent buying and installing brackets and supports for the layout frames. As of now, they are all officially installed and ready for the frames! See the picture to see what I am talking about.
These are installed all of the way around the walls. It is too messy to show the rest...
These are a combination of cheap simple brackets from Home Depot with a simple piece of 1x4 board on top. There are the basic L-brackets for standard supports and for the corners there are the kind with a support rod. There will be more load on these areas, so I wanted to put in some extra support. The boards are used because the brackets are kind of short and would not hold the 2 foot wide frames well. They all mount to the wall easily and securely. The only downside is neither type are actually level when installed. At least this is easy to correct when putting in the frames, may just need some shims.
This weekend will see the beginning of the frames! The wife will be out for a girl's day so I should be in with a train day :)
 |
| Please excuse the poor state of affairs I call the Train Room. |
These are installed all of the way around the walls. It is too messy to show the rest...
These are a combination of cheap simple brackets from Home Depot with a simple piece of 1x4 board on top. There are the basic L-brackets for standard supports and for the corners there are the kind with a support rod. There will be more load on these areas, so I wanted to put in some extra support. The boards are used because the brackets are kind of short and would not hold the 2 foot wide frames well. They all mount to the wall easily and securely. The only downside is neither type are actually level when installed. At least this is easy to correct when putting in the frames, may just need some shims.
This weekend will see the beginning of the frames! The wife will be out for a girl's day so I should be in with a train day :)
Monday, January 6, 2014
Clubs and Club Visits
There are two things that, in my opinion, have made model railroading as big as it is today. One is the internet. Between personal blogs and forums and online magazines, sharing ideas and products has never been easier. It is astounding to see people from across the planet coming together to talk about their hobby and ways to enjoy it more.
But for me the most important thing is the model train club. Before the internet had even been thought of, people gathered together to build massive modular traveling layouts or detailed permanent concepts that are amazing and a true sight to behold. Clubs keep hobbyists talking and thinking, with different viewpoints and interesting experiences (younger folks will recognize this as a "real-life forum). Recently I had the opportunity to visit a few.
First is a layout that is a part of the San Jacinto NMRA club. The Almeda Terminal & Gulf is a point to point permanent layout that focuses on operations with detailed structures and stock. It is a beautiful and fun layout, and the owner is quite nice and helpful. Click the links for more info. I got to see the AT&G on the annual open house tour, and even got to run a local switcher! It was a total blast!

The AT&G loco facilities. I got to operate the pair closest to the camera.
Second is an old club I was a member of a few years back. While I was in college I finally came into my modeling. I built a few small N scale layouts I could hide under my bed in the dorm and tried some simple weathering, but I never got very far. Two years before I graduated I found a flyer at a local hobby store for the Bryan/College Station Model Railroad Society. I went to visit the layout and was hooked. After being accepted as a member, I converted back to HO and started going to the regular meetings. Not only were these some of the best people I have ever met, they opened my eyes as to what there really is in the world of model railroading. They gave me insight and guidance, and if they didn’t know something, they could get me in touch with people who do. I owe these guys a lot and if you get a chance to go visit, it will be well worth your time!
Next up is a few pictures of my SRR locos on their visit to the BCSMRRS layout, the Gulf, Texas, and Western. This visit is what I was working so hard for in October. It went well and it is always fun hanging out with old friends.


Lastly is a shot of beautiful SP Daylight GS-4 (owned by another club member) and my modern day TRE commuter loco. It was too good to pass up!

Thursday, December 5, 2013
Wow...
It has been an absolutly crazy few months...
Last time I was here was August, oh so very long ago, and I gotta tell ya boys and girls, I see why model railroaders do not blog very often. We as a group tend to have a one track mind. However, we never know what track it will be on that day. I personally think "oh I will have so much time to write about my experiences and communicate with the world!" Then suddenly my train is on a completly different track, one that takes me far away from my intended destination. In the case of the past several months, I have been on the work late track, paint the house track, go to relative's homes track, just a whole interchange of tracks. Finally one has led me back here.
August and September I was met with a huge deadline at work, one that actually could determine not only my continuance but also the ability for the company to make money this year. Fortunately my company pulled together and we got through it (and even made some money!). Then at the end of September, a friend from my old train club while I was in college invited me to come run at their open house in October. I almost jumped out of my seat when I saw that! But, I was in the middle of working on all of my locomotives, so I had to focus on getting something done to be able to run. That was the most concentrated month of modeling I have ever experienced. I even brought little figures to work to paint on my lunch break. November was fraught with family visits and fun back pain due to a pulled ligament. So that turned into a "decompress from everything" month. Now I am working on getting my house ready for family to stay for Christmas. Nothing says fun like weekends spent painting and walls and rearranging furniture...
But I digress.
I will be back as soon as the dispatcher of life grants me the warrant to do so, and hopefully soon. I have a lot I want to talk about, pictures to share, and experiences to convey. Like you've read, a lot has happened. For now, take care and enjoy life everyone!
Sunday, August 11, 2013
Removing Factory Decals Without Re-painting
Howdy again! Today I will go over my experience with removing factory decals (and painted on words/numbers) and adding news ones without completely re-painting. I find this a very useful technique for quick roadname changes.
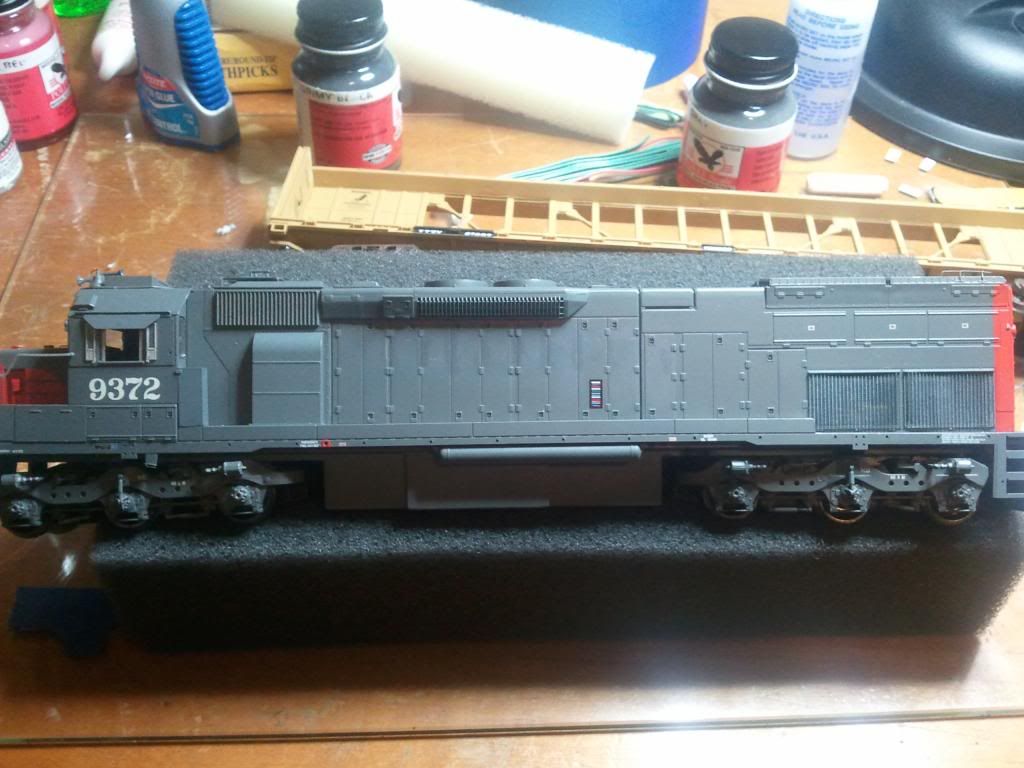
To begin, several months ago I was craving a Southern Pacific SD45T-2. Fortunately, Athearn produces this locomotive (click word for link) in several road names and numbers and they are really beautiful. The best details are the L-windows on the SP/SSW units and the walkways have treads! Adding aftermarket treading gets pricey and I am not very good at it. Being such iconic locomotives, and with my love of the SP, I decided I wanted one but only if I could pay less than $80 for one. I eventually got a Cotton Belt version through HO Interchange. This loco is just like the SP bloody nose scheme, except with the Cotton Belt roadname. For only $70 it seemed like a good way to get a cheap loco and it could be perfect with a quick paint job. It arrived a short time later and I set to work deciding the best way to paint over the lettering. I checked everywhere online and all of the advice I found was to remove the lettering instead of painting over it. This ensured that the paint would stay even and that there would be a good surface to apply the new decals. And after seeing the results, I have to agree. Here is what I did.
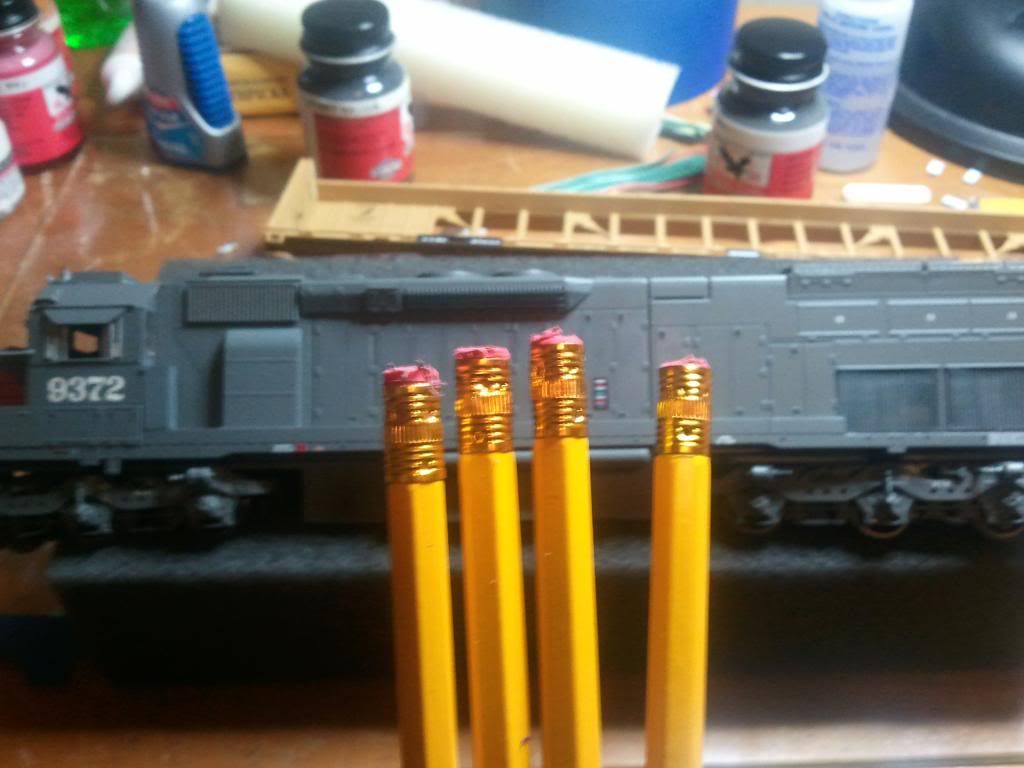
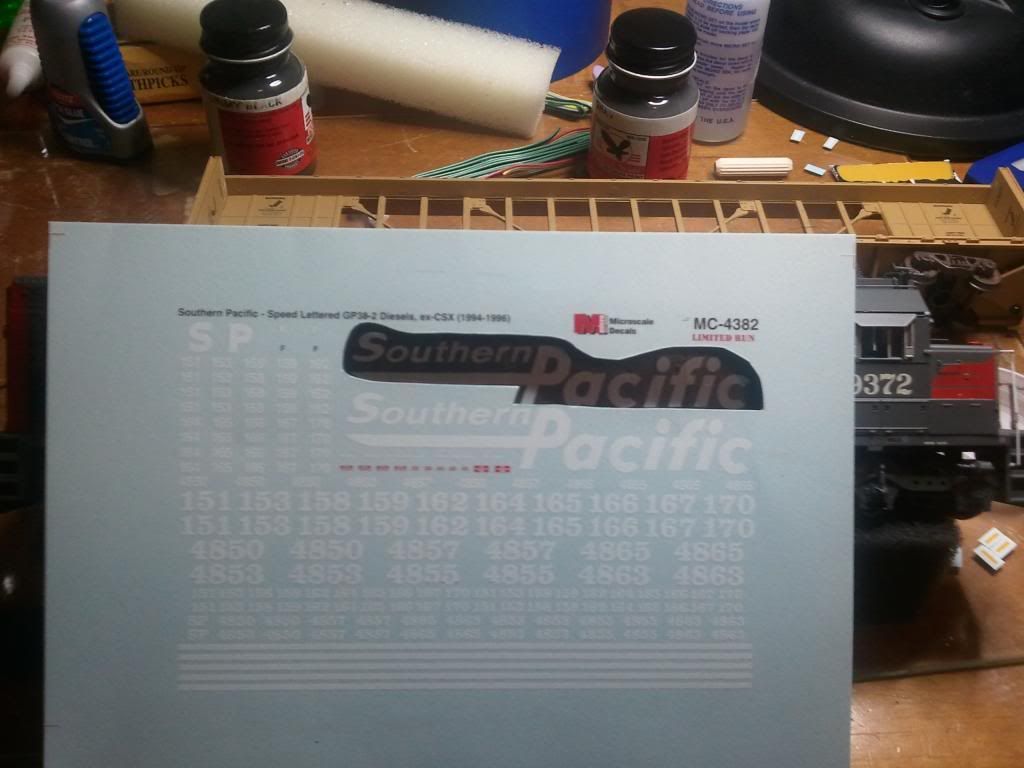
To begin, you order a set of decals. Microscale is the standard for quality decals so I found a set with Southern Pacific speed lettering. I used the set for the GP38-2 since it was hard to find one for tunnel motors. The next step was to remove the current lettering. I followed the simplest procedure I could find that had consistent results: pencil erasers. Yes, of all things, pink pencil erasers! There happened to be a lot of old No. 2 pencils sitting in one of my drawers so I grabbed 'em up and started using them. You use them by rubbing them against the lettering to be removed like you are trying to, well, erase it. What I found to work best was to focus on the lettering and use small, short strokes with a slight bit of pressure. If I pushed too hard or used long strokes that it began to remove the factory paint, and in one spot a bit of door detail. So use plenty of patience. **At your own risk, I have heard some use a small bit of 91% iso. alc. to aid in the process. I did NOT do this!**

All of the lettering came off after about 15 minutes per side. I had to do a little touch up with Pollyscale SP colors. I can pick out those spots in the above picture but they almost disappear once the new decals are on.

These are all cell-phone pictures so I apologize for the bad focus. These are the four pencils I used. As a warning, be careful of the metal eraser holder. That can really scratch up a model if it scrapes it!
Next I went through the typical procedure for applying a decal.

I think it turned out rather well.
 And there you have it! A speed-lettered Southern Pacific loco where there wasn't one before. I will eventually lightly weather this loco so that everything blends in perfectly.
So if you are looking for a simple, easy way to change to road names without going through the whole process of stripping and re-painting a loco, then this is the way to. As with most things, it is scary to begin but is much simpler than you realize. Do not be afraid, just take your time and it will turn out the way you want.
Comments and thoughts are always appreciated! See y'all next time
To begin, several months ago I was craving a Southern Pacific SD45T-2. Fortunately, Athearn produces this locomotive (click word for link) in several road names and numbers and they are really beautiful. The best details are the L-windows on the SP/SSW units and the walkways have treads! Adding aftermarket treading gets pricey and I am not very good at it. Being such iconic locomotives, and with my love of the SP, I decided I wanted one but only if I could pay less than $80 for one. I eventually got a Cotton Belt version through HO Interchange. This loco is just like the SP bloody nose scheme, except with the Cotton Belt roadname. For only $70 it seemed like a good way to get a cheap loco and it could be perfect with a quick paint job. It arrived a short time later and I set to work deciding the best way to paint over the lettering. I checked everywhere online and all of the advice I found was to remove the lettering instead of painting over it. This ensured that the paint would stay even and that there would be a good surface to apply the new decals. And after seeing the results, I have to agree. Here is what I did.
To begin, you order a set of decals. Microscale is the standard for quality decals so I found a set with Southern Pacific speed lettering. I used the set for the GP38-2 since it was hard to find one for tunnel motors. The next step was to remove the current lettering. I followed the simplest procedure I could find that had consistent results: pencil erasers. Yes, of all things, pink pencil erasers! There happened to be a lot of old No. 2 pencils sitting in one of my drawers so I grabbed 'em up and started using them. You use them by rubbing them against the lettering to be removed like you are trying to, well, erase it. What I found to work best was to focus on the lettering and use small, short strokes with a slight bit of pressure. If I pushed too hard or used long strokes that it began to remove the factory paint, and in one spot a bit of door detail. So use plenty of patience. **At your own risk, I have heard some use a small bit of 91% iso. alc. to aid in the process. I did NOT do this!**
All of the lettering came off after about 15 minutes per side. I had to do a little touch up with Pollyscale SP colors. I can pick out those spots in the above picture but they almost disappear once the new decals are on.
These are all cell-phone pictures so I apologize for the bad focus. These are the four pencils I used. As a warning, be careful of the metal eraser holder. That can really scratch up a model if it scrapes it!
Next I went through the typical procedure for applying a decal.
I think it turned out rather well.

So if you are looking for a simple, easy way to change to road names without going through the whole process of stripping and re-painting a loco, then this is the way to. As with most things, it is scary to begin but is much simpler than you realize. Do not be afraid, just take your time and it will turn out the way you want.
Comments and thoughts are always appreciated! See y'all next time
Subscribe to:
Posts (Atom)