Welcome to the home of the Spindletop Railroad!

Follow along as I try to create a freelanced railroad and build my first HO scale layout. I hope to write a blog that helps others in building layouts, detailing engines, and creating their own railroads while identifying the road bumps to avoid and the fun aspects of model railroading to look forward to!

Sunday, December 27, 2015

2015 Layout and Club Visits, End of 2015

This year was a good one for model railroading for a lot of us!  Since this is most likely my last post for the year, I think it appropriate to show off some of the local layouts and clubs and showcase their talents.

First up are some images of the local layouts.  Yes this is a picture heavy post...  Sorry mobile users.


Next are images from my favorite club, the Byan College Station Model Railroad Society!  (Yes some of these are my trains).


And on the SRR layout front, I have gotten the second module out of storage.  Some plans have changed at home and we aren't moving for a little while, so I got the corner out of storage.  It definitely needs some sceney!  I also used some birthday funds and purchased some non-working signals.  These are from Atlas and are the type G signals that are prevalent on SP trackage like the SRR runs on.  There are several surviving even on the Sunset line between Beaumont and Houston!  While they do not work, they still look great andhelp set the stage!

Finally, the random image.


This is the Conrail heritage locomotive by Norfolk Sourhern.  I had seen her once before but only technically.  This time she was out in the open wanting to be photographed, so I obliged.

Until next time, have a great rest of the year!  See you in 2016!

Sunday, October 25, 2015

Passenger Car Lighting

This is it!  The big post I've been mentioning.  Let's see if it lives up to expectations.

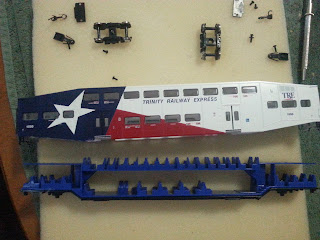
I have a passenger train called the TRE, or Trinity Railway Express.  It is a commuter line that runs between downtown Fort Worth and downtown Dallas through the Trinity River basin.  As a Texas boy I love the scheme so I've been working on making the model really awesome.  I will detail the models in a later post.  For me, the best thing to do to the cars is to add passengers and lights!  Can't usually see the passengers without lighting...  Not much gets through the thick plastic windows.

So the first thing that is needed for lighting passenger cars is the power source.  Some cars use batteries and some use track power, along with a few other ideas.  The best one is entirely up to the installer/user so examine the options and decide which you prefer.

In my case, I chose track power.  It has a few advantages over battery power: no need to replace the battery, no battery to hide, lights will always be the same brightness, etc, etc.  A downside is having to wire up the car to get power from the tracks.

The next step is to determine if there is the right equipment and room.  Some coaches may require more planning and test fitting of components than others.  Fortunately the coaches I have came with metal wheelsets and there are spaces on either end for the lighting circuit (above the seating on the single level areas).  This was determined by taking the car apart and test fitting the equipment. 

As seen in the picture of the trucks above, there is a gap between the frame and the wheels.  This is where I put the pickup wires.  I took the wire from burned out Athearn bulbs and made a simple loop around each wheel (the wheels are all individual, held together by the black plastic sleeve.  I can explain other ways to do this wiring if you have different wheelsets).  Below is the wired up truck.  It took several tries to get this right.  Basically the wire sits on the axle without being too tight and restricting turning, but is tight enough to provide constant contact.
Now the wires need a place to go.  I used my Dremel and vertical stand to drill a holes through the bottom of the frame.  It is the hole between the coupler screw and the truck mounting hole.  There is an identical one on the other end.  The wires go up and into the car where I used instant glue to guide them up the stairwell to above the circuit area.
Below is the lighting circuit completed.  I found the plans for this circuit in Model Railroader.  I do not remember the month unfortunately...  Anyways, the author was using it to provide lighting in his buildings using the track bus wires.  Fortunately it works just a well for lighting rolling stock!
 
Its consists of a small piece of wafer board, a 4700 Ohm resistor (I used a 1/4 Watt), a 220 microfarad capacitor (25 Volts or higher works perfectly), and a 1 Amp bridge rectifier (DF005M on Jameco Electronics website).  These are important to use.  The lights are DC powered so the AC powered track would blow them straight out.  The bridge rectifier converts the AC power to DC power, so now any lights can be used!  The resistor drops the voltage from about 12V (from the DCC system) to the ~3V of the lights.  The capacitor keeps the lights from flickering across dirty track or powerless switch frogs.
These pictures show how it is wired (front and back).  The AC power from the tracks goes to the ~ symbols, the positive output to the resistor, then to the lights.  The negative output goes to the lights.  The capacitor bridges the two outputs.

Now the wires are run to the lights. 

The lights are these seen here at MicroMark.  They are cheaper on eBay but take a very long time to arrive.  Basically they can be cut to the necessary length then stuck in place.  Fortunately for me, a strip of 3 and a strip of 9 fits perfectly.  I soldered the lights up to each other and the circuit.
Lastly, I ran them through the car, attached them in the desired location and secured the circuit.  I also put a few drops of instant glue in to control the wires and ensure the lights stay.  Incredibly simple!

To finish it up, I tested the lights out then reassembled the car!  Oh, and I put in some passengers.  Below are shots of the lighting on and the lighting off.

 
And that's it!  I spent about four hours over three days doing this.  The second one only took three hours.  If you have any questions on your install, please do not hesitate to ask!  I have done these on a few other cars.
 
Other things could be added, like on/off switches, dimmers, things like that.  To be clear, this car has the lights on as long as the track has power.  A switch or a DCC decoder could control that, but I didn't really want or need one. 
 
And now for the random pic of the day!
 
 
This is one of the new GE ET44AC locomotives.  These are the first locomotives to be EPA Tier IV compliant, and certainly distinct.  This GECX 2032 is one of the test bed engines that the Class I's have been running.  Here it is on a BNSF train being led by a Citirail ES44AC.  I caught this engine on the way home from work.  It was fun to come across such a rare locomotive without anyone else seeing it!


Sunday, September 13, 2015

Spindletop Caboose Fleet

Howdy everyone!

Okay so I finally am getting around to a filler post.  I am planning and working on a very long post that is a complete project tutorial.  Hopefully it will be useful for passenger car modelers.

Anyways, today is about the caboose fleet.  Now, many of you may be asking "why does a modern day railroad have cabooses?  Or cabeese?  Or whatever the heck the plural form of caboose is?  Didn't those go away?"  These are great questions.

First, I have no idea how to pluralize caboose...  I like cabeese though.

But more importantly, the caboose is not entirely defunct!  Yes the majority of them are museum pieces or scrapped, but there are several surviving in the world.  Even better, they are being put to good use by all sizes of railroads! 

The main purpose a caboose serves nowadays is a "switching platform" or a "shoving platform".  According to some regulations put forth by the FRA, any reversing move over a certain distance (I think it is 3 miles, but don't quote me on that) requires a shoving platform.  This can be almost anything that allows an operator to be on the end of a train that is being pushed from the front.  This operator will relay instructions and warnings to the engineer.  This way a train can easily access industries and locations that would normally require a lot of difficult or time consuming reverse moves and runarounds.  This is where the caboose comes in.

The caboose was already designed to accommodate conductors so it makes perfect sense that they be used for this task.  And this is the role they will be playing on the SRR.

This is SRR 10001.  She was a quick build I am using as a proving ground.  This is an old Athearn Blue Box wide vision caboose that I have had for years.  I sprayed it black and grey with a rattle can.  The yellow and white on the handrails and stepwells were from paint pens.  The lettering and conspicuity stripes are from Microscale decal sets I had leftover.  I like how the scheme turned out on this one, so it will be applied to all other SRR cabeese, except SP ones.  I am still working on a numbering system for them though, but that is for the future.
Since the SRR was so heavily intertwined with the Southern Pacific, I figured that for sure some of their equipment would have been retained.  In this case it is a bay window caboose, a classic of the SP.  This is an Athearn Genesis caboose with lights built in.  Quite beautiful really, a ton of detail work, lots of quality equipment like the interior, and the lights are incredible.  All LED and nary a flicker.  Another fun point of the Genesis rolling stock: the bearing caps turn.  Yes you can see them spinning along just like the prototype!

I do plan to have a few more cabooses one day.  For now these two are all I have room for!

And now, the random picture of the day!
I was out at lunch on Thursday the 10th and caught a very interesting moment.  Here we have three trains going three directions all in one shot!  The location is Tower 87, where Englewood and Settegast Yards meet and cross.  The train on the hump in the distance is being broken up into Englewood, which is over the main lines into Settegast with the EMD locos going south, and 9589 is turning North into Settegast from the Sunset line out of Beaumont.  Downtown Houston is just behind the humps, about 5 miles.  This is one of my favorite spots for railfanning!

Saturday, July 25, 2015

Trying Out Layout Lighting

Howdy!  Since I am down to a single module, I am using it as a test bed. 

One of those test items is a photo set.  I hope to at least be decent at taking train photos without post editing.  I have always admired photographers who can take really great photos and those who can do great Photoshop work and editing.  I am personally not interested in doing the editing work, I am not a huge fan of that sort of computer work.  I do however enjoy taking photos and getting the right one.  With that, I am going to practice taking model photos using this module.

I have tried getting good photos using my DSLR, a Canon T3i.  However, I have only gotten passable shots (at least in my opinion).  While I have a lot to work on, I have realized that one of the items that could help out is layout lighting!  I have LED bulbs in the room light fixture which put out a great white light, versus the yellowish of some bulbs.  It does a really nice job, but it doesn't provide quite enough light.  So, I built a layout lighting system.

The best part: I spent nothing on it!  It is entirely made from material I had on hand, mostly scraps.  I used some of the old wall supports to hold 1x2s out over the layout, about 20" long.  Then I used some leftover caulk and secured some old foam sheet to the out boards.  This is all supported by more 1x2 that is screwed into the layout.  Then I secured some of the LED strip lighting from my passenger car project, wired it all up, = and BOOM!  Layout lighting!  I added a strip of fascia to keep it nice looking.
The support.
 
Lighting turned off.
 
Lighting turned on.
 
It doesn't look like much in these photos but in person it is a huge difference.  There are six strips of LED lighting glued to the foam.  Very simple and easy.  Which makes me happy! 
 
I plan on doing this to all future layouts.  Also, there will soon be a backdrop but that is for another day!
 
Prototype photo!
 
Here I caught a pair of the HTRA MK1500D locos out of their natural habitat, and in a prime shot location.  Too bad I was driving and didn't have the nice camera.  So I grabbed this shot with my cell phone after I slowed to a crawl.  And yes I checked for other traffic!  Tthe HTRA locos and a BNSF genset move light to the repair shop of Englewood yard.


Sunday, July 12, 2015

Random Workings and Real Trains

Howdy again internet!

While the layout is dismantled and stored for the time being, I kept a module out for photo shoots and practicing different things.

Specifically, I kept the yard track module.  M reasons are simple.  It doesn't have any structures on it, so I am working on the scenery portion.  Scenery is the area I have the least experience in with layouts.  My previous layout endeavors only received minimal scenery, and it was all of the super cheap, super simple variety.  This layout has received new techniques, new products, new everything!

I am also working on adding in an overhead lighting system.  Once I get some fascia in and clean it up, I will post a how to.

In other news, my job has been secured for the immediate future.  Thankfully I have avoided the layoffs that are affecting so many in the oil and gas industry.  The best part of all of this?  I get to remain somewhat financially stable.  The second best part?  Trains.  Lots of them.  Seriously.  I spend most lunch hours cruising along the two biggest yards in Houston, possibly even this part of the state.  They are Englewood and Settegast Yards.  Englewood was once Southern Pacific and Settegast was Missouri Pacific.  Both are now absorbed by the UP...  However, they still provide the opportunity for some great finds.  I could almost do a daily post on the neat things I see out there.  Below are some of the better items!

A few weeks back we have a quintet of random 4 axle power roll through.  If I remember right, they were being sent from Canada to sell to short lines, or maybe Mexico.  I has been a while since they came through, sorry for the poor memory.

I watched this ridiculous load of something bundled get humped over one of the two hills in Englewood.  Thankfully none of the securing lines snapped!

Earlier this week, I was surprised by the Mopac heritage unit!  She was leading a through freight and I caught her while on a late lunch.  Perfect timing!  Also, UP needs to get her into a paint booth.  She is rusting out the battery boxes, the handrails are all beaten up, and that fuel tank is almost shameful. 
I caught this beauty on Friday.  She is a CSX SD40-2 but she was rebuilt with the strange cab that you see here.  It also includes an odd nose.  Still, a fun one to see in person!

Lastly, we have the catch of the month!  I could not believe my luck with this one.  Here is FEC 800.  She is in Texas trying to get to San Antonio to be converted to LNG at one of the loco facilities there.  This catch was entirely luck as I did not know this loco would be in town until I had already gotten to work, and then the yard was nice enough to leave her out with no trains in the way!  Truly a beautiful locomotive and a true joy to catch.
 
Anyways, that is all from me for now!
 

Sunday, May 17, 2015

Changes and New Life

Well the past couple weeks have been busy.  The last time I was this busy I was graduating college...  The last week of April I got a new job!  It is a fun job with a lot of potential and near the big train yards but it is on the other side of town.  In most cities, that doesn't mean much.  However, I live in the Houston metroplex.  My commute is an hour each way.  With traffic it can be much worse.  My better half is also getting a new job in about the same area.

Sooooo we will be moving soon. 

I haven't even gotten a chance to work on the layout in over a month we have been so busy.  And now, it is dismantled for a while.  Fortunately it is in modules for this exact situation.  I have gotten most of it packed away but I am leaving the yard module out so I can experiment on the scenery.  Hopefully soon we will have a new place for the layout.  Now to move across the 4th largest city in the country.  Wish me luck!

Also, the CFO (again, better half) has finally caved.  That's right.  A backyard railroad has been begrudgingly approved!  So in a few months, I will have an HO layout and a small 1/8th scale railroad I can ride!  If you want to learn more about these types of models, check out Discover Live Steam and explore around.  They have a lot of good information and links.

Anyways, that is life for the time being.  I hope to be back on here soon with a new home for the SRR.  Maybe I can use this time to really flesh it out, get some things set, figure out what I am doing with it long-term. 

Random pic of the day!


These two are of the local run near my house.  Business must be picking up because I have never seen such a long train or three engines on it.  The locos are in the UP Y21XX series and are MPI MP20GP re-builds of old GP50s.  They have Cat 3516C motors that generate 2000 HP and meet Tier II EPA regulations.  They are used down here to service several industries, but I love seeing the big gondolas, bulkheads, and tankers.  Very modern and very cool!

Wednesday, April 8, 2015

Scenery Update

Last time I talked about my process for creating the scenery around the yard.  Well, as I was looking at it while working on other things I decided I didn't really like it.  I couldn't tell why at the time so I just ignored it and kept going.  A few days later I was trying to level out the garden in my back yard when it hit me: it was all too flat!  The fine turf creates a great blend of colors when viewed from above, but when viewed from a sitting or lowered view it is rather bland. 

To break up the boring, I decided to begin adding other types of turf.  In this case, coarse turf in Medium and Light Green from Woodland Scenics.


These two bags contain a product that is similar to taking the fine foam an rolling several pieces into a ball.  It takes a little work to spread around but is definitely a great product for my needs!  I spread it out in a random pattern and then glued it down using the same methods from the previous post.  While the glue was still wet, I sprinkled on a little more the coarse and fine turfs to add more color and blend it all together.  Below are the results.


So why it is all still as flat as a board (get it?!) this creates a better visual that draws the eye away from the flat land and creates a sense of elevation changes.

I plan on enhancing this using grass/bush tufts of various forms from several makers before calling it complete.

And now for the prototype photo of the day!

Here we have BNSF 1244 and a sister, both 3GS21B locomotives, transfer some cars from the Pearland Yard to the South Yard in Houston, TX.  I love whole train shots so this was a lucky catch!   Plus it is always fun to hear the reefer compressor units running (all on the end of the train).  Now if only I could get rid of all of the weeds, signs, old posts, etc.